[ React.JS ] Mini Project - Todo List
2025.01.21 기점으로 ( 본인 소속 ) 컴퓨터공학과 스터디 사이트 제작을 위한 React 학습. [ 1학년 겨울방학 프로젝트 ]
React 의 기술적인 구현 기록보다, React 를 처음 접하며 미니 프로젝트를 진행하는 과정에서의 흐름과 기본적인 개념을 정리하기 위해 작성.
타 React 프로젝트 구현 시 개인 복기용으로 참고할 수 있도록, 첫 구현 과정에서 겪은 문제점과 새롭게 정립한 개념을 총망라하여 상세히 작성되어 있음.
( 개인적인 학습 목적이므로 직접적인 도움이 전혀 되지 않습니다 ❌ )
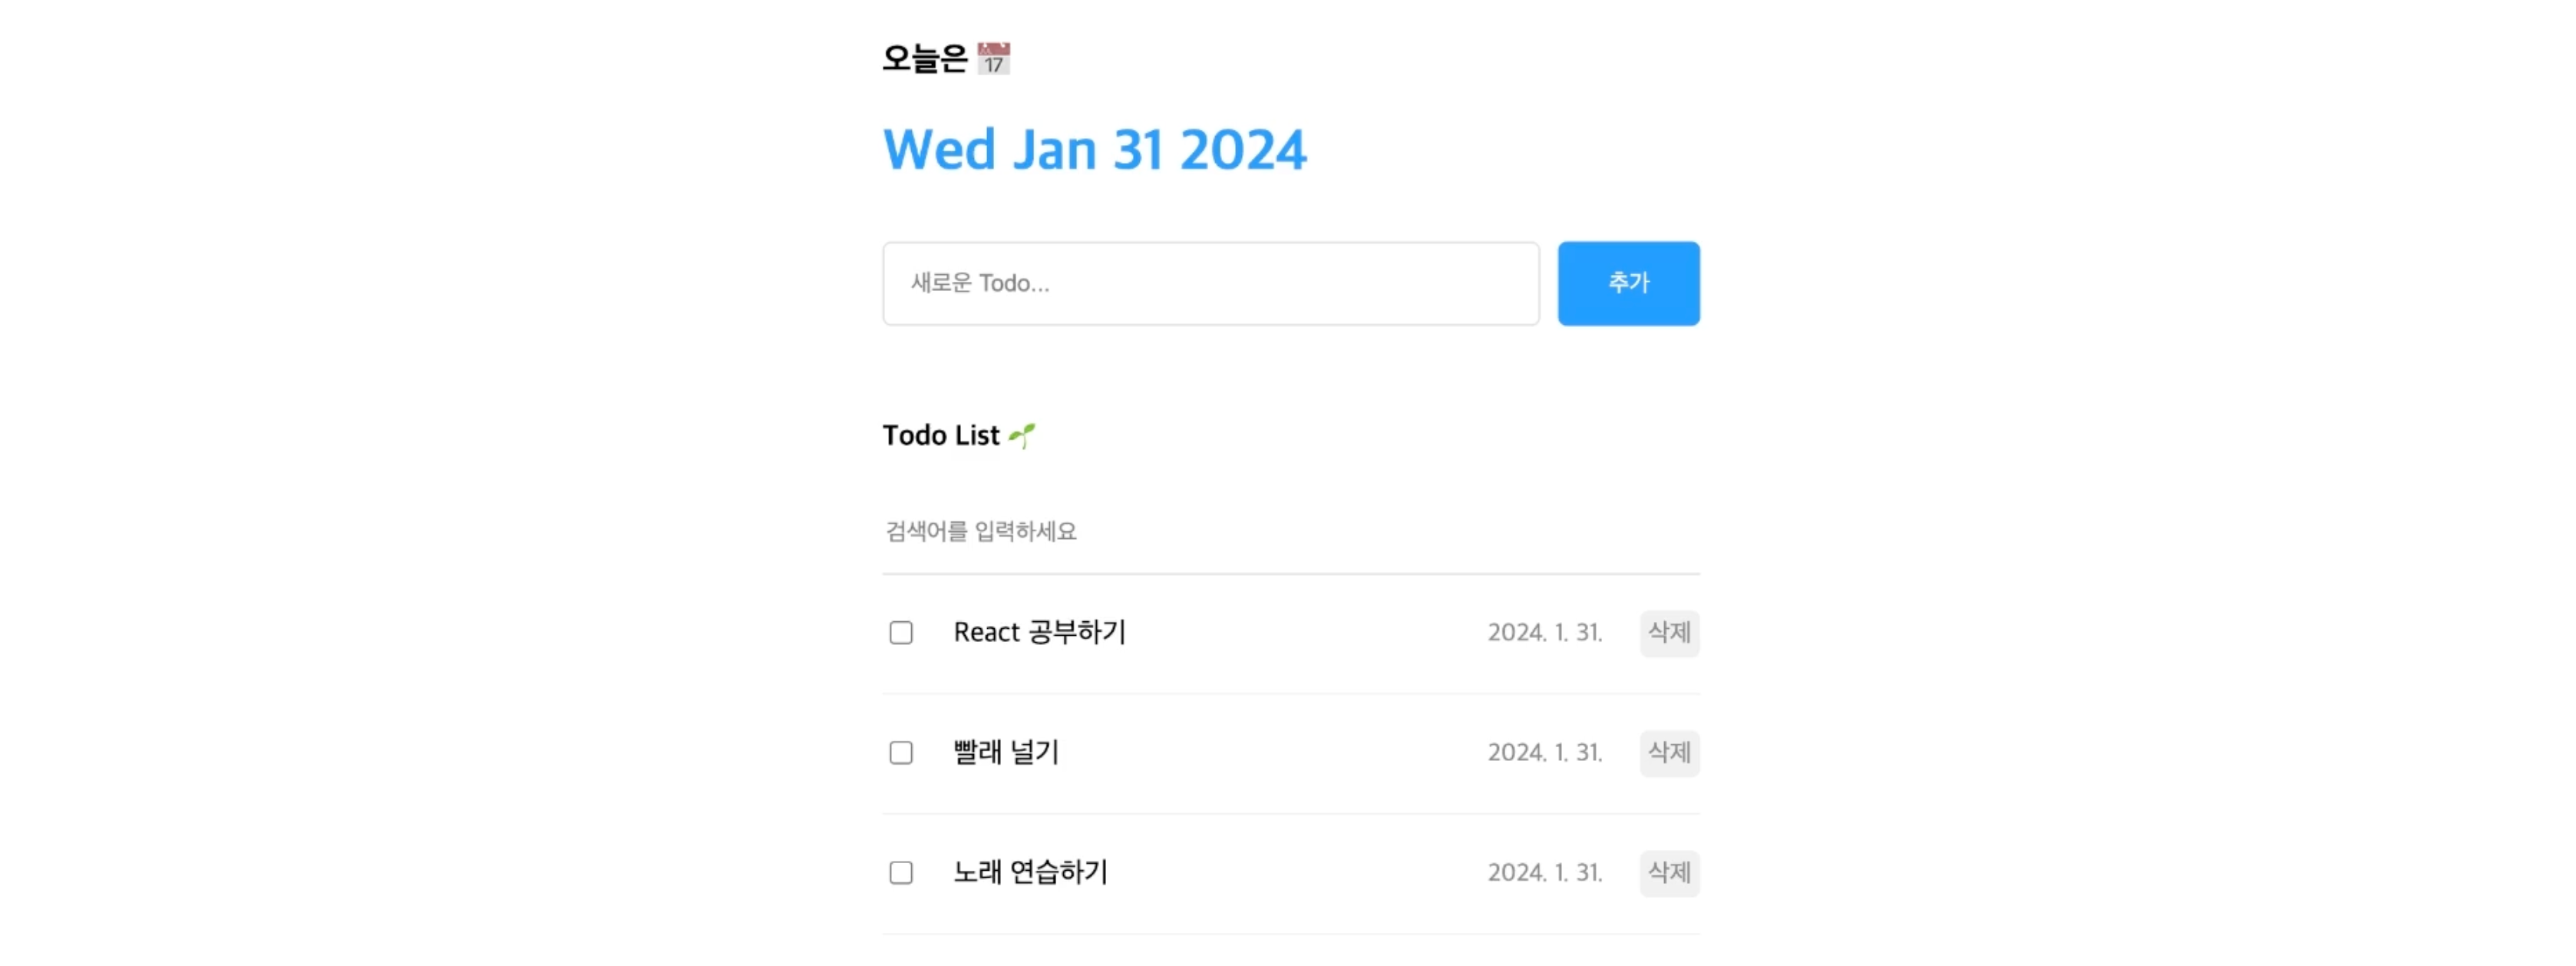
𝟎. React Basic Concepts
🌱 Module / Component
Module : Js 코드의 재사용성, 효율성 위해 독립적으로 분리된 코드 단위
Component : UI(사용자 인터페이스)의 독립적이고 재사용 가능한 단위로, 주로 화면의 특정 부분을 구성.
🌱 UseState
useState는 컴포넌트의 상태를 저장하고 변경할 때 사용.
상태가 변경될 때마다 React는 컴포넌트를 다시 렌더링하여 UI를 업데이트.
1
2
3
4
5
6
const [count, setCount] = useState(0);

const handleIncrement = () => {
  setCount(count + 1);
};
count (상태변수) : 현재 상태(값) 을 저장하는 변수
setCount (상태 변경 함수) : 상태를 업데이트 하는 함수
useState(0) : 호출결과는 [count, setCount] 형식의 배열로 반환
🌱 Event Handler
1
2
3
4
5
6
7
8
9
10
11
12
13
14
15
16
17
18
19
20
21
const Editor = ({ onCreate }) => {

  const [content, setContent] = useState("");

  const onChangeContent = (e) => {
    setContent(e.target.value);
  }

...

  return (
    <div className="Editor">
      <input
      value={content}
      onChange={onChangeContent}
      placeholder="새로운 Todo..."
      />
      <button onClick={onSubmit}>추가</button>
    </div>
  )
};
이벤트 핸들러 : 특정 이벤트가 발생했을 때 실행되는 함수.
이 함수가 호출되면 React는 count의 값을 업데이트하고 컴포넌트를 다시 렌더링하여 UI가 최신 상태를 반영합니다.이벤트 객체 (e)
1
2
3
const onChangeContent = (e) => {
setContent(e.target.value);
};
e (event 객체) : 이벤트가 발생할 때 자동으로 전달되는 객체입니다.
e.target : 이벤트가 발생한 HTML 요소(예: input태그).
e.target.value : 입력 필드에 사용자가 입력한 현재 값.
🌱 UseRef
useRef는 React 컴포넌트에서 값을 저장하지만, 리렌더링을 유발하지 않는 상태를 유지할 때 사용하는 훅.
즉, 값은 보존되지만, 값이 변경되어도 컴포넌트가 다시 렌더링되지 않음.
1
2
3
4
5
6
7
8
9
10
11
12
13
14
import { useRef, useEffect } from "react";

const Component = () => {
  const isMounted = useRef(false);

  useEffect(() => {
    if (!isMounted.current) {
      console.log("컴포넌트가 처음 마운트됨");
      isMounted.current = true;
    }
  });

  return <h1>컴포넌트 예제</h1>;
};
🌱 React 단방향 데이터 흐름과 콜백 함수의 관계
- 부모 → 자식의 흐름
부모 컴포넌트가 자식에게 데이터를 내려보낼 때는 props를 사용
데이터는 부모에서 자식으로만 흘러가고, 자식은 받은 값을 읽을 수만 있음(수정 불가).
```js
const App = () => {
const message = “안녕, 리액트!”; // 부모의 상태 또는 값
return <ChildComponent text={message} />;
};
const ChildComponent = ({ text }) => {
return <h1>{text}</h1>;
};
1
2
3
4
5
6
7
8
9
10
11
12
13
14
15
16
17
18
19
20
21
22
23
24
25
26
27
28
29
30
31
32
33
34
35
36
37
38
39
40
41
42
43
44
45
46
47
48
49
50
51
52
53
54
55
56
57
58
59
60
61
62
63
64
65
66
67
68
69
70
71
72
73
74
75
76
77
78
2. **자식 → 부모의 흐름 (콜백 함수 사용)**
자식 컴포넌트에서 부모의 상태를 직접 바꿀 수 없기 때문에, 부모로부터 함수를 “콜백 함수” 형태로 내려받고 실행함으로써 부모의 상태를 업데이트.
**콜백함수는 부모가 만든 함수이므로, 부모의 상태를 변경할 수 있는 권한이 있음.**
```js
const App = () => {
const [message, setMessage] = useState("안녕!");
const updateMessage = (newMessage) => {
setMessage(newMessage); // 부모의 상태 변경
};
return <ChildComponent onUpdate={updateMessage} />;
};
const ChildComponent = ({ onUpdate }) => {
return (
<button onClick={() => onUpdate("리액트가 좋아!")}>
메시지 변경
</button>
);
};
```
# 𝟏. UI 구현하기 ( only Css )
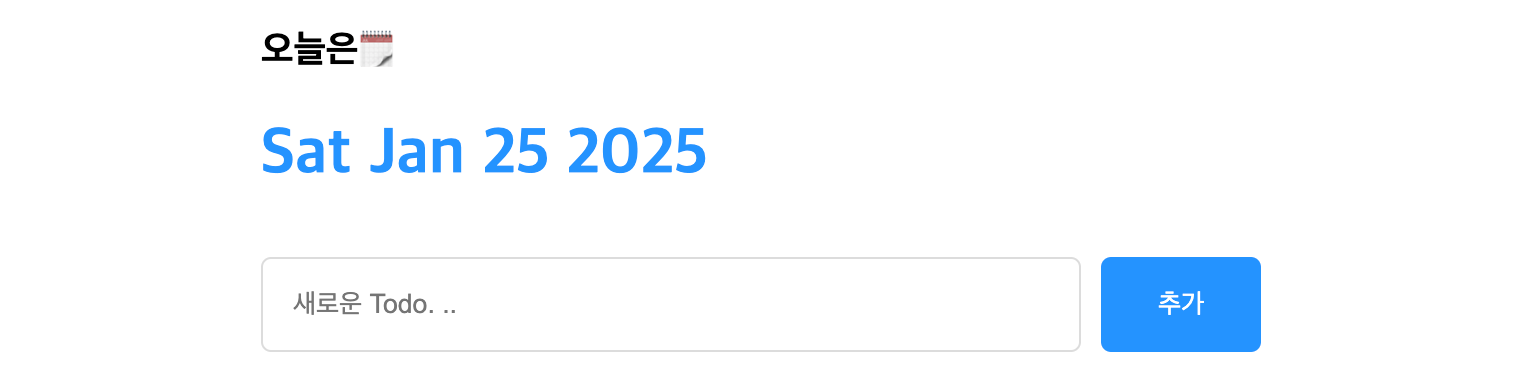
```css
.Header > h1 {
color: rgb(37, 147, 255);
}
```
```css
.Editor {
display: flex;
gap: 10px;
}
.Editor > input {
flex: 1;
padding: 15px;
border: 1px solid rgb(220, 220, 220);
border-radius: 5px;
}
.Editor > button {
cursor: pointer;
width: 80px;
border: none;
background-color: rgb(37, 147, 255);
color: white;
border-radius: 5px;
}
```
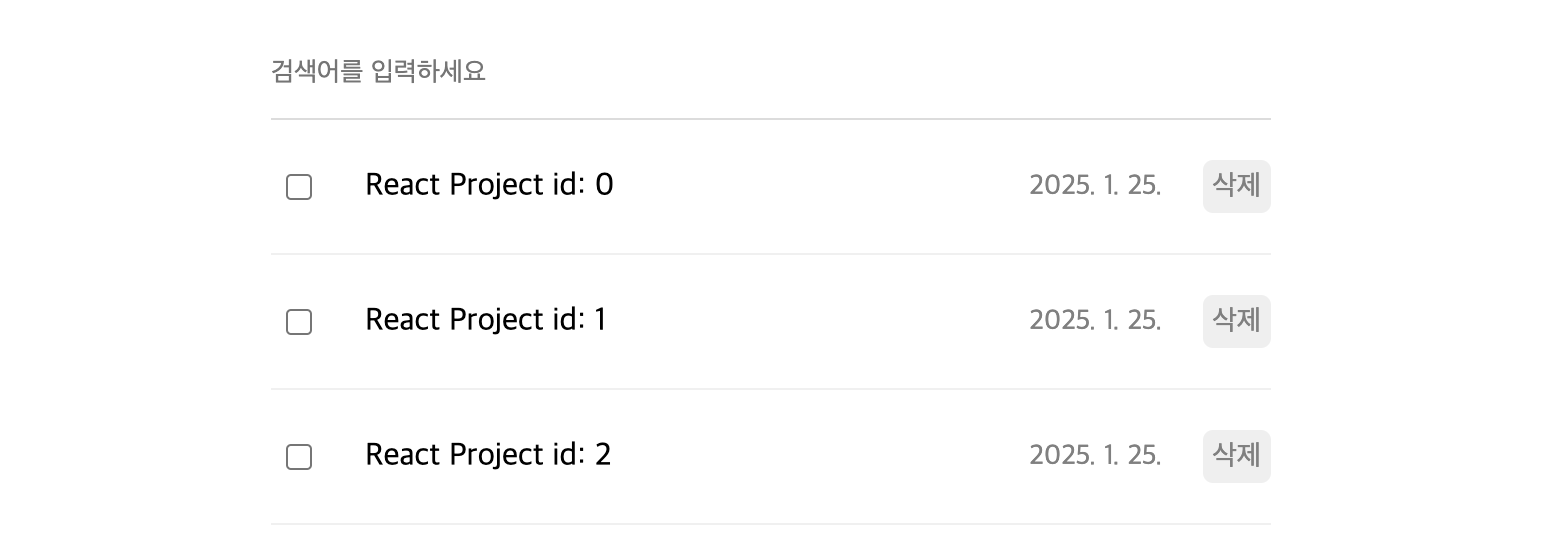
```css
.List {
display: flex;
flex-direction: column;
gap: 20px;
}
.List > input {
width: 100%;
border: none;
border-bottom: 1px solid rgb(220, 220, 220);
padding: 15px 0px;
}
.List > input:focus {
outline: none;
border-bottom: 1px solid rgb(37, 147, 225);
}
.List > .TodoWrapper {
display: flex;
flex-direction: column;
gap: 20px;
}
1
2
3
4
5
6
7
8
9
10
11
12
13
14
15
16
17
18
19
20
21
22
23
24
25
26
27
.TodoItem {
  display: flex;
  align-items: center; /*가운데정렬*/
  gap: 20px; /*간격*/
  padding-bottom: 20px; /*아랫방향 내부여백 */
  border-bottom: 1px solid rgb(240, 240, 240);
}

.TodoItem > input {
  width: 20px;
}

.TodoItem > .content {
  flex: 1;
}
.TodoItem > .date {
  font-size: 14px;
  color: gray;
}
.TodoItem > button {
  cursor: pointer;
  color: gray;
  font-size: 14px;
  border: none;
  border-radius: 5px;
  padding: 5px;
}
𝟐. Feature Implementation
𝟐-𝟏. 기능구현 준비
State는 모든 컴포넌트의 조상이 되는 App Component 에 배치
📁 App.jsx ( 모델링만 진행 )
1
2
3
4
5
6
7
8
9
10
11
12
13
14
15
16
17
18
19
20
21
22
23
24
25
26
27
28
29
30
31
32
33
34
35
36
37
38
39
40
41
42
43
44
45
46
47
48
49
50
51
52
53
54
55
import './App.css'
import { useState, useRef } from 'react'
import Header from './components/Header'
import Editor from './components/Editor'
import List from './components/List'

const tempData = [ /*Data Modeling*/
  {
    id: 0,
    isDone: false,
    content: "React Project id: 0",
    date: new Date().getTime(),
  },

  {
    id: 1,
    isDone: false,
    content: "React Project id: 1",
    date: new Date().getTime(),
  },

  {
    id: 2,
    isDone: false,
    content: "React Project id: 2",
    date: new Date().getTime(),
  },
];

function App() {

  const [todo, setTodo] = useState(tempData);
  const idRef = useRef(3);

  const onCreate = (content) => {
    const newTodo = {
      id: idRef.current++,
      isDone: false,
      content: content,
      date: new Date().getTime()
    }
    setTodo([newTodo, ...todo])
  }

  return (
    <div className='App'>
      <Header />
      <Editor onCreate={onCreate} />
      <List todo={todo} />
    </div>
  )

}

export default App
𝟐-𝟐. Create - Todo 추가하기
💾 Editor.jsx “추가” 버튼 구현, Editor input 빈칸일 시 포커싱 & 함수 비호출,
📁 Editor.jsx
1
2
3
4
5
6
7
8
9
10
11
12
13
14
15
16
17
18
19
20
21
22
23
24
25
26
27
28
29
30
31
32
33
34
35
36
37
38
39
40
41
42
43
44
45
import "./Editor.css";
import { useState, useRef } from "react";

const Editor = ({ onCreate }) => {

  const [content, setContent] = useState("");
  const onChangeContent = (e) => {
    setContent(e.target.value);
  }

  const contentRef= useRef();


  const onSubmit = () => {
    if(content === "") { // 빈칸일 때 focus & onCreate 함수를 호출하지 않음
      contentRef.current.focus();
      return;
    };
    onCreate(content);
    // content.current = '';
    setContent(""); // 빈 문자열로 state 초기화
  }

  const onKeydown = (e) => {
    if (e.keyCode === 13) {
      onSubmit();
    } // Enter, onSubmit() 함수 실행
  }

  return (
    <div className="Editor">
      <input
      value={content}
      ref={contentRef} // ref는 React에서 DOM 요소에 직접 접근할 수 있도록 도와주는 기능
      onKeyDown={onKeydown} // 사용자가 키보드를 눌렀을 때 발생되는 이벤트
      onChange={onChangeContent}
      placeholder="새로운 Todo. .."
      />

      <button onClick={onSubmit}>추가</button>
    </div>
  )
};

export default Editor;
𝟐-𝟑. Read - Rendering
💾 리스트 형태로 렌더링, 리스트 검색 기능 구현
배열에 담긴 값을 리스트 형태로 반복적으로 렌더링 하려면, 배열 메서드 중 MAP 메서드를 사용.
리액트 내부적으로 리스트 형태로 렌더링된 컴포넌트 들이나 요소들을 서로 구분할때 각각의 요소를 key 란 prop 를 통해서 구분 ex) key={todo.id}
…todo는 spread 연산자를 사용하여 객체의 모든 속성을 TodoItem 컴포넌트에 전달하는 문법
1
2
3
{todo.map((todo) => {
  return <TodoItem key={todo.id} {...todo} />;
})}
리스트 검색 기능을 구현하려면 (검색된 리스트만 시각화), 검색어가 변경이 되었을 때 리스트 컴포넌트가 리렌더링이 되어야 함.
그렇기에, 현재 검색어를 state 로 보관해야 함. 하단 코드에 구현.
🌱 화살표 함수에서 중괄호 {} 사용 시 return이 필요한 경우와 필요하지 않은 경우
1
2
3
4
5
return todo.filter((entryItem) => {
	entryItem.content
	.toLowerCase()
	.includes(search.toLowerCase())
});
초기에 (entryItem) => { blahblah }); 로 구현. 오류 발생.
화살표 함수의 문법
중괄호 {}를 사용하는 경우 (명령문 방식) → 반드시 return 필요
화살표 함수의 본문에서 여러 줄의 로직을 실행할 수 있음.중괄호 {} 없이 한 줄 표현식 사용 (표현식 방식) → return 필요 없음
📁 List.jsx getFilterData 함수 문법을 참고.
1
2
3
4
5
6
7
8
9
10
11
12
13
14
15
16
17
18
19
20
21
22
23
24
25
26
27
28
29
30
31
32
33
34
35
36
37
38
39
40
41
42
43
44
45
46
47
import "./List.css";
import TodoItem from "./TodoItem";
import { useState } from "react";

const List = ({todo}) => {

  const [search, setSearch] = useState("");
  const onChangeSearch = (e) => {
    setSearch(e.target.value);
  };

  const getFilterData = () => {
    if (search === "") {
      return todo;
    }
    // filter 메서드를 호출해서 filtering 된 todo 배열을 반환.
    // callback 함수를 전달해준 다음,
    // callback 함수에서 todo 를 매개변수로 받아,
    // 현재 todo 컨텐츠에 includes 메서드를 호출하여,
    // search 값이 존재하는 아이템들만 필터링 하도록 만들어줌.
    return todo.filter((entryItem) =>
      entryItem.content
        .toLowerCase()
        .includes(search.toLowerCase())
    ); // 소문자로 검색해도 나오도록 구현
  };

  const filteredTodo = getFilterData();

  return (
    <div className="List">
      <h4>Todo List🌱</h4>
      <input
        value={search}
        onChange={onChangeSearch}
        placeholder="검색어를 입력하세요"
      />

      <div className="TodoWrapper">
        {filteredTodo.map((entryItem) => {
          return <TodoItem key={entryItem.id} {...entryItem} />;
        })}
      </div>
    </div>
  )
};
export default List;
📁 TodoItem.jsx
1
2
3
4
5
6
7
8
9
10
11
12
13
14
import "./TodoItem.css";
const TodoItem = ({id, isDone, content, date}) => {
  return (
    <div className="TodoItem">
      <input readOnly checked={isDone} type="checkbox"/>
      <div className="content">{content}</div>
      <div className="date">{new Date(date).toLocaleDateString()}</div>
      <button>
        삭제
      </button>
    </div>
  )
}
export default TodoItem;
𝟐-𝟒 Update - Todo 수정하기
🌱 리액트에서 상태를 부모 컴포넌트(App.jsx)에서 관리해야 하는 이유
체크박스 버튼 클릭시 수정 구현을 App.jsx → List.jsx → 📁 TodoItem.jsx 에 구현해봄.
1
2
3
4
5
6
7
8
9
10
11
12
13
  const [tempbool, setBool] = useState(isDone);

  const onClickButton = () => {
    setBool(!tempbool);
  }

  return (
    <div className="TodoItem">
      <input
        checked={tempbool}
        onClick={onClickButton}
        type="checkbox"
      />
하지만 이는 React 의 상태 관리 철학에 어긋난다는걸 알게됨.
단방향 데이터 흐름 (Unidirectional Data Flow)
• 데이터는 부모에서 자식으로만 전달.
• 자식은 부모의 상태를 직접 수정할 수 없으며, 콜백 함수를 통해 상태 변경 요청만 가능.단일 상태 관리 (Single Source of Truth)
• 모든 상태는 중앙 집중적으로 한 곳(부모 컴포넌트)에서 관리되어야 함.
• 이렇게 하면 데이터 동기화 문제를 방지하고, 상태 흐름이 예측 가능해짐.컴포넌트 간 상태 공유
• 부모 컴포넌트가 상태를 관리하면 여러 자식 컴포넌트가 동일한 데이터를 공유할 수 있음.
• 예: “전체 선택/해제”와 같은 기능 구현이 용이해짐.
📁 App.jsx
1
2
3
4
5
6
7
8
const onUpdate = (targetId) => { // update 하고자 하는 target의 id 를 인수로.
  setTodo(todo.map((entryTodo) =>
    entryTodo.id === targetId
      ? { ...entryTodo, isDone: !entryTodo.isDone}
      : entryTodo
    )
  );
};
todo State 값들중에 targetId 와 일치하는 id 를 갖는 todo item 의 idDone 변경
인수 : todo 배열에서 targetId 와 일치하는 id 를 갖는 요소의 데이터만 딱 바꾼 새로운 배열
📁 TodoItem.jsx
1
2
3
4
5
6
7
8
9
10
11
12
13
14
		...

const onChangeCheckBox = () => {
  onUpdate(id);
}
return (
  <div className="TodoItem">
    <input
      onChange={onChangeCheckBox}
      checked={isDone}
      type="checkbox"
    />

        ...
🌱 체크박스에서 onChange를 사용한 이유
체크박스는 일반 버튼과 달리 상태 변화(state change)가 발생하기 때문에 onChange 이벤트가 더 적절.
체크박스의 상태가 “체크됨 → 체크 해제” 로 바뀌었을 때, React는 상태 변화를 감지해야 함.
onClick은 클릭 동작만 감지하며, 값이 실제로 변경되었는지 여부는 알지 못함.
즉, 동작은 클릭이라고 볼 수 있지만 결국 해당 동작으로 발생되는 이벤트는 체크가 변경되는 이벤트 이므로 onChange 이벤트 핸들러를 사용.
𝟐-𝟓 Delete - Todo 삭제하기
📁 App.jsx
1
2
3
const onDelete = (targetId) => {
  setTodo(todo.filter((entryTodo) => entryTodo.id !== targetId))
}
𝟑. Final Version
📁 App.jsx
1
2
3
4
5
6
7
8
9
10
11
12
13
14
15
16
17
18
19
20
21
22
23
24
25
26
27
28
29
30
31
32
33
34
35
36
37
38
39
40
41
42
43
44
45
46
47
48
49
50
51
52
53
54
55
56
57
import './App.css'
import { useState, useRef } from 'react'
import Header from './components/Header'
import Editor from './components/Editor'
import List from './components/List'

const tempData = [
  /*Data Modeling*/

  /*
    {
      id: 0,
      isDone: false,
      content: "React Project id: 0",
      date: new Date().getTime(),
    },
  */
];

function App() {

  const [todo, setTodo] = useState(tempData);
  const idRef = useRef(0);

  const onCreate = (content) => {
    const newTodo = {
      id: idRef.current++,
      isDone: false,
      content: content,
      date: new Date().getTime()
    }
    setTodo([...todo, newTodo])
  };

  const onUpdate = (targetId) => { // update 하고자 하는 target의 id 를 인수로.
    setTodo(todo.map((entryTodo) =>
      entryTodo.id === targetId
        ? { ...entryTodo, isDone: !entryTodo.isDone}
        : entryTodo
      )
    );
  };
  const onDelete = (targetId) => {
    setTodo(todo.filter((entryTodo) => entryTodo.id !== targetId))
  }

  return (
    <div className='App'>
      <Header />
      <Editor onCreate={onCreate} />
      <List todo={todo} onUpdate={onUpdate} onDelete={onDelete} />
    </div>
  )

}

export default App
📁 Header.jsx
1
2
3
4
5
6
7
8
9
10
11
12
13
14
15
16
import "./Header.css";
const Header = () => {

  const today = new Date().toDateString();

  return (
    <div className="Header">
      <h3>오늘은🗓️</h3>
      <h1>
        {today}
      </h1>
    </div>
  )
};

export default Header;
📁 Editor.jsx
1
2
3
4
5
6
7
8
9
10
11
12
13
14
15
16
17
18
19
20
21
22
23
24
25
26
27
28
29
30
31
32
33
34
35
36
37
38
39
40
41
42
43
44
import "./Editor.css";
import { useState, useRef } from "react";

const Editor = ({ onCreate }) => {

  const [content, setContent] = useState("");
  const onChangeContent = (e) => {
    setContent(e.target.value);
  }

  const contentRef= useRef();

  const onSubmit = () => {
    if(content === "") { // 빈칸일 때 focus & onCreate 함수를 호출하지 않음
      contentRef.current.focus();
      return;
    };
    onCreate(content);
    // content.current = '';
    setContent(""); // 빈 문자열로 state 초기화
  }

  const onKeydown = (e) => {
    if (e.keyCode === 13) {
      onSubmit();
    } // Enter, onSubmit() 함수 실행
  }

  return (
    <div className="Editor">
      <input
      value={content}
      ref={contentRef} // ref는 React에서 DOM 요소에 직접 접근할 수 있도록 도와주는 기능
      onKeyDown={onKeydown} // 사용자가 키보드를 눌렀을 때 발생되는 이벤트
      onChange={onChangeContent}
      placeholder="새로운 Todo. .."
      />

      <button onClick={onSubmit}>추가</button>
    </div>
  )
};

export default Editor;
📁 List.jsx
1
2
3
4
5
6
7
8
9
10
11
12
13
14
15
16
17
18
19
20
21
22
23
24
25
26
27
28
29
30
31
32
33
34
35
36
37
38
39
40
41
42
43
44
45
46
47
48
49
import "./List.css";
import TodoItem from "./TodoItem";
import { useState } from "react";

const List = ({todo, onUpdate, onDelete}) => {

  const [search, setSearch] = useState("");
  const onChangeSearch = (e) => {
    setSearch(e.target.value);
  };

  const getFilterData = () => {
    if (search === "") {
      return todo;
    }
    return todo.filter((entryItem) =>
      entryItem.content
        .toLowerCase()
        .includes(search.toLowerCase())
    ); // 소문자로 검색해도 나오도록 설정
  };

  const filteredTodo = getFilterData();

  return (
    <div className="List">
      <h4>Todo List🌱</h4>
      <input
        value={search}
        onChange={onChangeSearch}
        placeholder="검색어를 입력하세요"
      />

      <div className="TodoWrapper">
        {filteredTodo.map((entryItem) => {
          return (
            <TodoItem
              key={entryItem.id}
              {...entryItem}
              onUpdate={onUpdate}
              onDelete={onDelete}
            />
          );
        })}
      </div>
    </div>
  )
};
export default List;
📁 TodoItem.jsx
1
2
3
4
5
6
7
8
9
10
11
12
13
14
15
16
17
18
19
20
21
22
23
24
25
26
27
28
import "./TodoItem.css";
const TodoItem = ({id, isDone, content, date, onUpdate, onDelete}) => {

  const onChangeCheckBox = () => {
    onUpdate(id);
  }
  const onClickButton = () => {
    onDelete(id);
  }
  return (
    <div className="TodoItem">
      <input
        onChange={onChangeCheckBox}
        checked={isDone}
        type="checkbox"
      />
      <div className="content">{content}</div>

      <div className="date">{new Date(date).toLocaleDateString()}</div>

      <button onClick={onClickButton}>
        삭제
      </button>

    </div>
  )
}
export default TodoItem;